How to improve customer onboarding process for retention in 2025


Every SaaS team wants reliable, predictable growth. The fastest route is simple: improve customer retention / reduce churn (attrition). When new users reach value quickly, they stick around, upgrade, and advocate for the product.
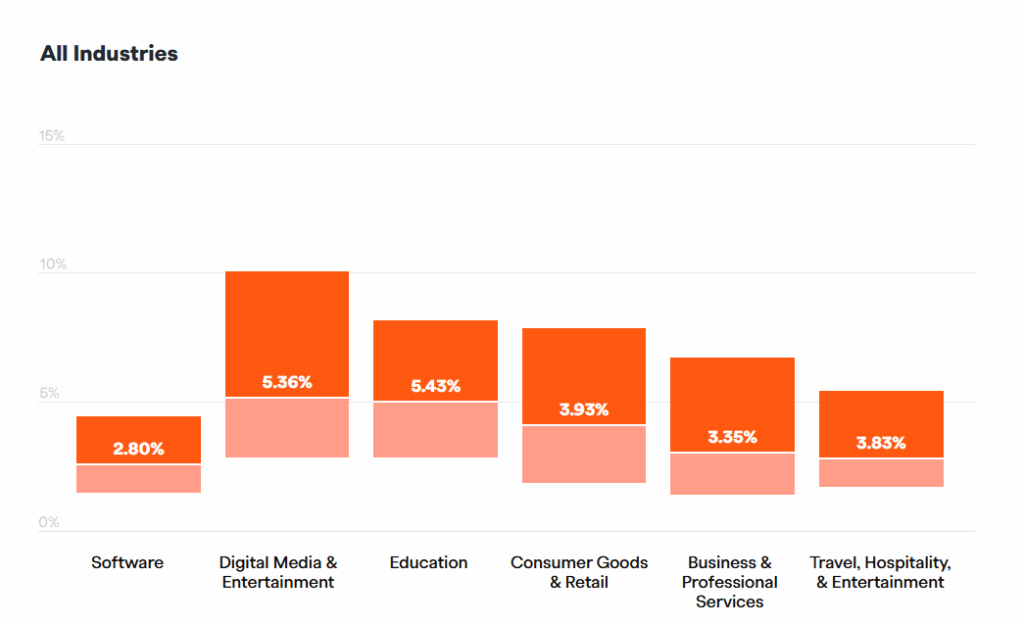
Industry data confirms the urgency. In SaaS market Churn rates range from 1-5 % monthly with 4% considered a "good benchmark" according to Recurly, which also provides churn stats across various industries.
As Wikipedia states "Companies often use customer attrition analysis and customer attrition rates as one of their key business metrics (along with cash flow, EBITDA, etc.) because the cost of retaining an existing customer is far less than the cost of acquiring a new one."
And acquiring you will be, as even the modest 4% churn rate results in almost 40 % (38.7 to be exact) of customers having to be replaced - acquired over a year just to maintain the existing customer base!
Why customer onboarding is the retention lever
The first run sets the tone for a long‐term relationship. Retention analyses reveal that users who perform the “aha” action during their initial session are three times more likely to renew than those who delay.
Onboarding bridges the gap between marketing promises and lived product value. It introduces core features, builds confidence, and removes friction before frustration can grow.
Can something like 70% reduction in onboarding churn be real? Yes, read how all this worked in practice for Fitness Player - a companion app for fitness studios and trainers in Sweden and UK.
Map the onboarding journey before optimising
Start by charting each click a new user must make to realise value. Note where guidance is missing or where users exit. This process, championed in many growth teams, exposes silent blockers you cannot see in aggregate dashboards.
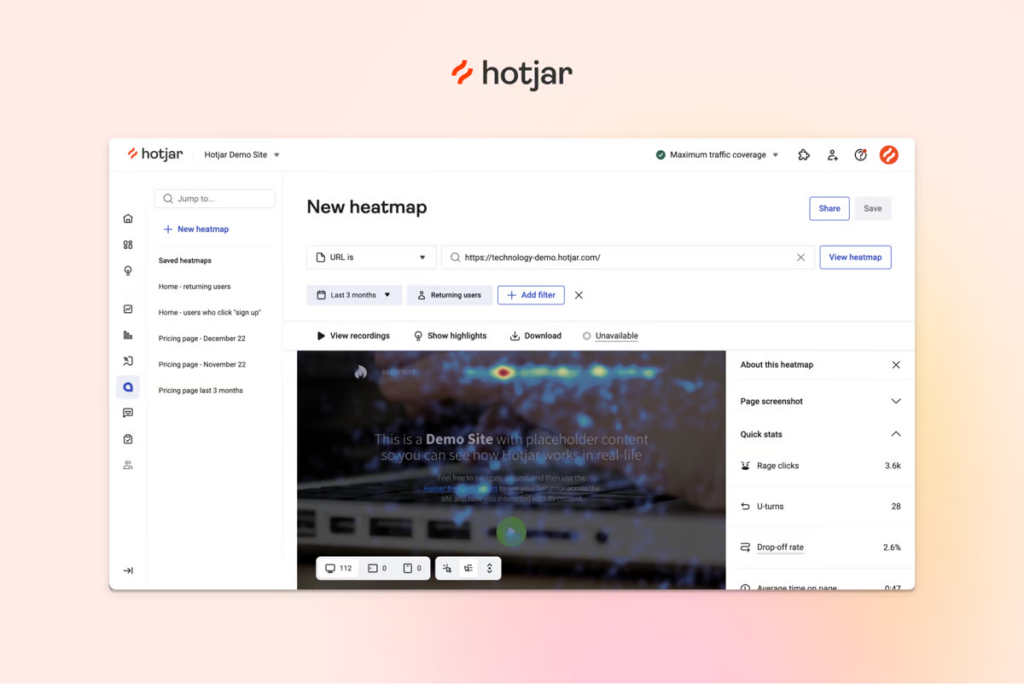
A journey map shows where users click; a friction audit reveals why they hesitate. Modern teams with large SaaS vendors may record hundreds or thousands of first-run sessions, send rage-click coordinates and dwell-time spikes to an AI LLM, then receive instant suggestions - shorter tooltips, auto-skipped steps, or reordered forms. Engineers fix issues in hours rather than days, and marketers see activation curves rise before the next sprint even starts.
Whether you run a single-purpose web app or a sprawling enterprise platform, uncovering friction is now quicker than ever. Lightweight tools such as Hotjar or Microsoft Clarity let smaller teams watch ten key replays, tag rage-clicks, and tweak copy - maybe even the same afternoon.
And if you are starting really small, you can do some things just yourself or with help of your colleagues (preferably those new to the product) "roleplaying" new users and writing down notes.
At the other end of the spectrum, larger products feed thousands of sessions into an LLM that recommends skipping steps, merging fields, or re-ordering tutorials - changes that can lift activation within one sprint.
Essential artefacts
Persona matrix: A micro-SaaS might have only two roles—owner and end user - yet mapping their distinct jobs (e.g., “export report” versus “log task”) still sharpens messaging and onboarding content. Complex B2B tools often juggle a dozen personas, from billing admins to read-only auditors. Detailing each role’s goals prevents generic onboarding and lets you tailor tours or tooltips that resonate immediately.
Activation funnel: For a niche time-tracking app, the funnel could be as simple as 1) sign-up → 2) create first project → 3) start timer. Tracking drop-offs at each micro-step highlights obvious fixes. Enterprise software may require multiple parallel funnels - import data, invite colleagues, configure integrations - so teams instrument each path and compare conversion to pinpoint where high-value accounts stall.
Success definition: A single-feature note-taking tool might choose “first note saved” as its north-star metric because that action predicts 90-day retention. Multifaceted platforms often employ a compound goal, such as “dashboard created and shared with two teammates,” which blends depth and collaboration signals. Aligning experiments to one clear success measure—simple or composite—guards against chasing vanity metrics and keeps everyone focused on improving customer retention.
Seven practical tactics to improve the onboarding process for retention in 2025
The pillars of strong onboarding have not changed: be clear, stay relevant, and show progress. What has changed is the speed at which small tweaks influence revenue. AI copy assistants, real-time segmentation, and product-usage graphs now let lean teams ship micro-optimisations daily and see retention curves move within a sprint.
Use the playbook below as a modular checklist. You can apply each tactic to a one-page utility app or a multi-module enterprise suite. Layer them together and watch early-stage churn shrink.
1. Automate welcomes
Send a friendly in-app banner and a concise email within five minutes of sign-up. This “golden window” is when curiosity is highest and distractions are few. Reference the user’s goal, not your feature list, and include a single call-to-action pointing to the first value step.
Lightweight tools such as Customer.io or Mailchimp let solo founders build these sequences without code. Larger teams stitch product events into Braze or Salesforce Marketing Cloud for richer targeting.
2. Personalise tours
Generic walkthroughs feel like training videos; personalised tours feel like coaching. Detect role, plan tier, or even marketing channel, then show only the steps that matter. An admin may need billing settings, while a front-line user needs task filters.
3. Embed AI self-support
AI assistants such as Product Fruits Copilot, UserGuiding AI, or WalkMe Coach answer natural-language questions using your docs, and some such as Copilot, can even handle ongoing support conversations with users, who then solve issues without leaving the screen - and support queues shrink.
With highly capable AI support agents like Copilot, some small SaaS companies can operate without live support AND keep their users happy. UK legacy planning startup adeus does just that - combining live Copilot support chats with async e-mail support, read more in our case study or watch short video below.
https://vimeo.com/1095643838?share=copy#t=0
4. Highlight quick wins
Design your flow so the user achieves a small but meaningful victory—import a contact, create a note, or send a test invoice—within their first five clicks. Dopamine from success anchors positive emotion to your brand.
List ideas for common app types:
- CRM: add one lead and mark stage “Contacted.”
- Analytics: connect Google Tag Manager and view first chart.
- Design tool: drag an image into a blank canvas.
5. Use progressive disclosure
Hide complexity until it is needed. Typical approach is to segment and stage onboarding into steps using an onboarding checklist, which also provides visual reference for user on his progress.
Alternatively, after the first success, surface an optional “Next step” ribbon that teaches an intermediate feature. This keeps novices confident and power users curious.
6. Solicit early feedback
Drop a one-question survey—“Was anything confusing so far?”—immediately after the first value event. Keep response options as quick emoji taps. Qualitative gems emerge while the experience is fresh.
If you collect more than 25 responses pointing to the same hurdle, add a tooltip or rewrite copy before the next cohort arrives.
7. Iterate weekly
Adopt a rhythm: Monday pull metrics, Tuesday brainstorm hypotheses, Wednesday launch A/B, Friday quick review. Even 1 % lifts compounds. Sunset flows that fail repeatedly; double down on winners.
Technology stack: choosing tools that scale
The build-versus-buy debate is largely settled. In 2025, buying specialist onboarding software wins on speed, compliance, and total cost. Mature vendors ship SOC-2, ISO 27001, and GDPR controls by default, cutting security review cycles from weeks to days. Solo founders gain enterprise-grade safeguards without hiring infosec staff, while larger teams avoid spending quarters rebuilding features that already exist.
Yet purchase decisions are trickier because product categories have converged. Tour builders now bundle AI chat, analytics tools add in-app guides, and digital adoption suites offer everything. The goal is not picking the “most features,” but selecting interoperable tools that increase productivity, share events, user IDs, and permissions to prevent data silos and accelerate insight.
Core categories and integration patterns
Interactive tour builders (i.e. Product Fruits, Appcues, Chameleon) handle onboarding flows, checklists, and announcements. Lightweight JavaScript snippets make them suitable for niche apps, while robust APIs accommodate enterprise routing rules.
AI self-support assistants (Product Fruits Copilot, UserGuiding AI, WalkMe Coach) answer “how-do-I” questions on the spot. Even smaller SaaS can thus benefit from powerful AI LLM/RAG solutions trained on their own support content or documents with minimum risk of hallucinations.
Onboarding and Product analytics (Amplitude, Heap) visualise funnels and retention cohorts. Choose a tool that accepts real-time events from your tour builder, otherwise you will reconcile metrics manually. Mid-market teams often start with Mixpanel, then graduate to Amplitude once they cross 50 k MAU.
Evaluation checklist
- Open APIs and webhooks: needed for in-house BI or data warehouses.
- Role-based access control: critical once multiple teams edit flows.
- Localization pipeline: supports growth into non-English markets.
- Pricing aligned with usage, not seats, to avoid surprise bills.
Quick sample comparison for 10 k monthly active users
- Product Fruits Grow — $149 / mo (tours + AI Copilot)
- UserGuiding Growth — $249 / mo + $99 AI add-on
- Appcues Essentials — $249 / mo (no native AI yet)
Bottom line: start with one tool per category, insist on clean event export, and revisit architecture each time your active-user base 5×’s. Interoperable choices today save months of re-platforming tomorrow and directly help improve customer retention.
Measure, learn, repeat
Onboarding success is too important to judge by gut feeling or a single vanity metric. Small teams can track five numbers in a spreadsheet; enterprises wire real-time dashboards across BI tools. Regardless of scale, the methodology is the same: define leading indicators, automate collection, review weekly, experiment, and feed outcomes back into the roadmap. The flywheel turns faster, and you continuously improve customer retention.
Lagging metrics—monthly churn or net revenue retention—arrive too late to save at-risk cohorts. Instead, monitor leading signals that predict whether users will renew before month three. Instrument these events during onboarding; otherwise you will guess at root causes and fix the wrong screens.,
Key metrics and why they matter
- Activation rate: The percentage of sign-ups completing the core value action. A one-point gain often yields multiple points of long-term retention.
- D30 stickiness: Users who perform the key action on three of the last seven days, thirty days post-sign-up. Predicts expansion likelihood better than simple log-ins.
- Assisted-resolution rate: Tickets solved by AI chat or self-help versus human agents. Zendesk’s 2025 benchmark links a 15 % rise in assisted resolutions to an 11 % drop in churn.*
- Feature depth: Median number of distinct features used by activated accounts. Low depth signals future downgrade risk.
- Time-to-value (TTV): Hours from sign-up to first success. Cutting TTV by 20 % lifted ARR growth 18 % for mid-market SaaS in a 2024 Amplitude study.
*User onboarding tools and digital adoption platforms were able to significantly optimize user support, reducing tickets by 30% already before onset of AI support assistants, as our Chemsoft Case Study illustrates. With the arrival of AI support based on LLM with RAG techniques, we are often seeing human-handled support case reductions of 50% or more.
Cadence and tooling
Adopt a weekly cycle: Monday pull metrics, Tuesday flag anomalies, Wednesday ideate experiments, Thursday launch, Friday share learnings. Start-ups can manage in Notion and Mixpanel; larger firms automate alerts in Looker or Tableau with data piped from Segment, Product Fruits, and Pendo.
Finally, visualise metrics by cohort rather than calendar month to correct for seasonality or campaign spikes. When you see a cohort stall, re-watch their sessions, launch a targeted experiment, and close the loop. Measurement is not the final step—it is the engine that drives continuous retention gains.
Conclusion
An intentional onboarding process remains the highest-ROI tactic to improve customer retention. Map journeys, personalise guidance, embed AI self-help, and iterate relentlessly.
Even modest activation gains compound. A 5 % lift in early retention can translate into 25 % more ARR within twelve months—proof that onboarding is no longer a nice-to-have but a core growth engine.


Weekly newsletter
Get the latest releases, tips, articles, and exclusive interviews delivered to your inbox weekly—no spam!