Users these days have zero patience, myself included.
So it’s important to actively help them use and understand your app from the very start.
One very strong tool to support user engagement are Tours.
Today, the reality is that applications are either innovative or just derivatives of something already on the market, which makes them redundant.
Innovative applications are always challenging for new customers to learn and to quickly understand how they solve their problems.
Among the most powerful tools to support user engagement are the Tours, also called the step-by-step guides.
Let’s talk about what the tours are and how they help you increase the conversions from free trial users to paying customers.
What are Onboarding Tours anyway?
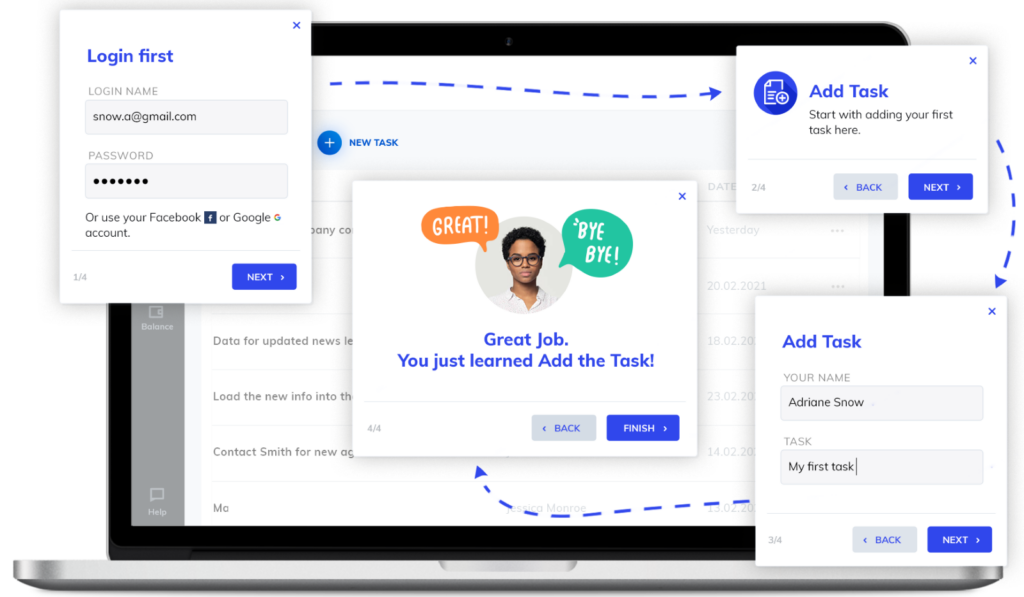
Tours are interactive cards through which you can communicate with users.
Their purpose isn’t to control your application but to act as a communication bridge between your app and the users.
The Tours work as an independent, interactive layer on the top of your application to become an effective tool.
Any adoption tool, Tours included, must be easily controlled by your product managers, success managers, and so on, and without any interaction with your (chronically overbooked) IT. Flexibility is the key here.
Usually, they’ll come in a form of a sequence of cards, but they can also be standalone cards. Generally, they showcase an app functionality, but you can use them for communicating a variety of things (inviting users to webinars, asking for feedback, offering an upsell, etc.).
The purpose of the onboarding tours is to onboard users into the application. The boarding tours will guide your users step by step through your app, sequentially revealing its functionalities.
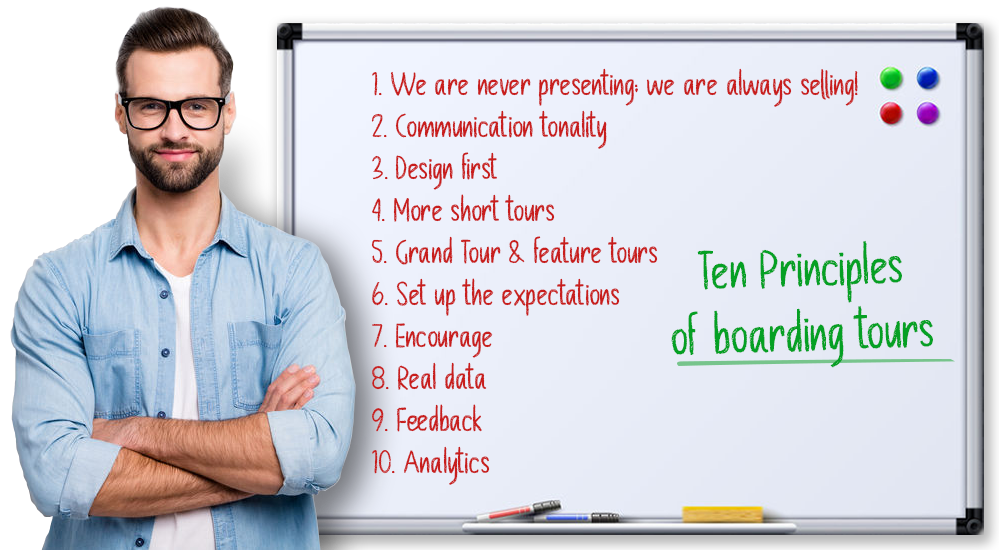
10 Onboarding tour principles
1. We never present – we always sell
The purpose of onboarding tours is to increase your profit. It sounds simple, and hardly anybody can challenge that, but it’s incredible how people can forget this primary goal.
It is the same as selling a car. It’s not enough to tell the potential clients that if they turn this knob, the lights turn on, if they press the gas pedal, the car goes faster. You won’t sell much with that approach. 🙂
A good salesperson never just presents; they always sell, praise the vehicle, highlight its best features, and motivate the client to close the deal. With web apps – it is exactly the same.
Do not fall into the trap of just describing the features of your app; you need to show why your app is the only one that will solve the customer’s needs and challenges. You need to impress and excite. You are selling!
2. Tone of voice
Think about who your customers are and how you communicate with them.
Will you be reaching out to them using their first or last names? I tend to use a friendlier and less formal form of communication, but this isn’t always appropriate for every situation.
Many factors can influence tonality, such as local customs, culture, and the brand personality you are trying to create.
You should communicate with the highest level of respect, but do not be afraid to be friendly and personal. You want to build a relationship with your counterpart.
3. Design it first
Think about which parts of the app each tour describes, what information each card will contain, and in which sequence they will show up.
You’ll change the content over time for sure, but the initial design is the fundament you should start with. I use Miro for designing the flow, but Slides or PowerPoint work great too.
4. Keep it short
A tour should not have more than ten cards. Try to separate information into several logical tours, do not squeeze all the content into one long tour. A long tour is not flexible, it’s challenging to edit, and the user can’t pick just the part they are interested in.
Some users will cancel the tour right at the beginning as they rush to experience the app themselves. This is perfectly fine because you want to give your users the option to relaunch each tour when they need to. Therefore, it’s better to have several tours describing different parts and aspects of the app.
5. Welcome Tour, Grand Tour & Features Tours
Having a “Welcome Tour” at the start of the app is important; it should be brief, but very motivating. This is not an in-depth descriptive tour, it is rather marketing-oriented, welcoming the user and highlighting the app’s unique selling points. You are selling here.
Then your user shall experience something we call “Grand Tour” where you are describing the whole application, but not in detail. Rather you show just an overview, highlighting the synergies and benefits. This is also an excellent place to add references and testimonials from other users, which is a great way to motivate new clients to buy your service.
The additional “Feature tours” that follow, should focus on specific app elements, sections with less of a marketing tone (but remember – you are still selling).
6. Set up the expectations
When holding myself a demo presentation, I always start by mentioning how long the presentation is. It’s essential to set these expectations; otherwise, the other party will have a priori feelings that the demo will be too long and they will not be focused and listening.
You should use the same idea in the boarding tours: number the cards so the user can see how many are left.
7. Encourage
Motivate and encourage your users! Make them feel safe and comfortable that they are doing everything correctly and are on the right track.
After finishing each part, thank them and ideally reward them with some form of gamification.
8. Use real data
Motivate customers to input their real data and work with them. When they have their data in your app and see results with the actual real value for them, they will have the motivation to continue using your app.
Using demo data has its place too because you can present many features better when the app is already filled with a lot of content. But the user’s data just works better.
9. Feedback
Be in contact with your users during onboarding.
Tours should not be just a one-directional communication tool; You want to know what your customer is thinking, what they do like and don’t like.
You can use features such as adoption meters, feedback, questionnaires, and communicate with users through chat.
Customer feedback is not just a tool for gathering information but also a great motivational tool. If users can communicate their opinions to you and get answers, they bond with you, like the app more, and even forgive you a couple of bugs.
10. Analytics
The boarding phase of a new potential customer should not be a black box. You want to know where the users get stuck in your app, where they have issues, and where you lose them, and why.
This data helps improve not only your onboarding process but also optimizes the app itself.
The best solution is to integrate the boarding analytics into your main analytics such as Google Analytics, Mixpanel, or Heap to get the best insights.
You Need To Continously Optimize Your Onboarding
At the start of using your app, each lead is very fragile and easy to lose. Well implemented tours won’t only be increasing conversions from free trial users to paying customers, but also dramatically cut your boarding and customer care costs.
It’s a never-ending process, and you want to tune tours just like you tune your app. See tours as a part of your product, adjust them, change them, experiment. See them as a communication tool where your communication and user engagement are the keys to success.
Not using our no-code product adoption toolbox yet? Try it free here or book a demo with our product adoption expert.